- Continue Shopping
- Your Cart is Empty
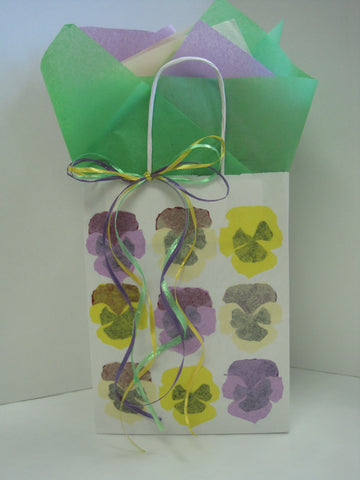
Pansies for Mom - By Yvonne @ Edmonton Store
You will need:
- 8 x 10 white shopping bag
- Tissue paper colours of your choice, but you will need a dark tone and a light tone. For the dark tones I used Purple, Dubonnet and Black. One sheet of each colour will make many flowers! Light tones were Lilac, Dandelion and French Vanilla
-
Raffia. I used a strand each of purple, dandelion and green.
I found a great image of “how to draw a pansy” online, the size was perfect too!
http://www.dragoart.com/tuts/5903/1/1/how-to-draw-a-pansy.htm
- scissors
- mod podge glue
Instructions:


- Print out the pansy image from the website, or you can draw your own.
- Cut strips of the tissue paper wide enough for the stencils to fit on, and fold the length of the tissue a few times, so that you are cutting out multiple flower shapes at the same time. A little fiddly, but worth it.
- Using the lighter coloured tissue, cut out the flower shape. I did not include leaves.
- Often the top two petals are a different colour from the rest of the flower, so I made another stencil of these two petals to cut in a darker tone.
- The small patches of many pansies are black or a dark colour. Using this shape, cut out a stencil.
- Decide on the placement of your flowers. I used three rows of three in a grid style pattern. Apply the mod podge to the dark pieces first, one at a time. Work as quickly as you can, the tissue gets very fragile, gently smooth them onto the face of the bag. It’s probably easier, if more time consuming, to complete one flower at a time. You don’t need to wait for the glue to dry before you layer the lighter tissue on top of the dark patches and petals. There is no need to layer more glue on top of the flowers.
- Allow to dry, fill with your gift for mom, add some tissue paper and tie on a raffia bow.
Happy Mother’s Day!

Leave a comment
Creative Packaging, A113-2099 Lougheed Highway, Port Coquitlam, BC V3B 1A8
© 2024 Creative Packaging (Canada)


X
Glenda Semotiuk
Author